"SQL Server replication requires the actual server name to make a connection to the server. Connections through a server alias, IP address, or any other alternate name are not supported."
Cause : the server name has been changed after SQL Server Installation
Resolution : You can change the server name in SQL server by using the code below; Execute in SSMM.
sp_dropserver 'old_server_name'(Ex : oldserver\instance)
GO
sp_addserver 'current_computer_name'Ex : newserver\instance), 'local'
Read more...
Thursday, July 7, 2011

Thursday, June 2, 2011
Last Backup Date of SQL DBs
SELECT sdb.Name AS DBName,
COALESCE(CONVERT(VARCHAR(20), MAX(bus.backup_finish_date), 100),'No Backup Yet') AS LastBackUpDate FROM sys.sysdatabases sdb LEFT OUTER JOIN msdb.dbo.backupset bus ON bus.database_name = sdb.name
GROUP BY sdb.Name
Read more...
COALESCE(CONVERT(VARCHAR(20), MAX(bus.backup_finish_date), 100),'No Backup Yet') AS LastBackUpDate FROM sys.sysdatabases sdb LEFT OUTER JOIN msdb.dbo.backupset bus ON bus.database_name = sdb.name
GROUP BY sdb.Name
Read more...
Friday, May 27, 2011


Thursday, May 26, 2011
Vmware ESX4.1 Add ISCSI Storage
Follow the steps below to create new VMKERNEL Connection to use with ISCSI adapter.
If you dont do the steps below and try to add iscsi target from dynamic discovery
You will see the message
"The host bus adapter is not associated with a vmknic. To configure targets the adapter should be associated with a vmknic. Refer to the VMware documentation to associate the adapter with a vmknic."
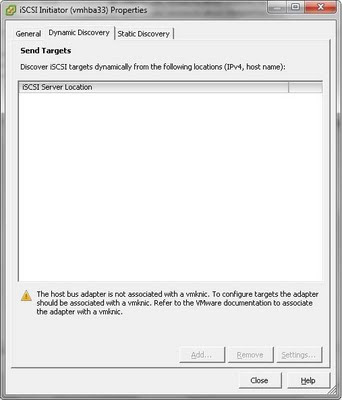
Procedure
If you dont do the steps below and try to add iscsi target from dynamic discovery
You will see the message
"The host bus adapter is not associated with a vmknic. To configure targets the adapter should be associated with a vmknic. Refer to the VMware documentation to associate the adapter with a vmknic."

Procedure
1 Log in to the vSphere Client and select the host from the inventory panel.
2 Click the Configuration tab and click Networking.
3 In the Virtual Switch view, click Add Networking.
4 Select VMkernel and click Next.
5 Select Create a virtual switch to create a new vSwitch.
6 Select a NIC you want to use for iSCSI traffic.
7 Click Next.
8 Enter a network label.
Network label is a friendly name that identifies the VMkernel port that you are creating, for example,
iSCSI.
9 Click Next.
IMPORTANT If you are creating a port for the dependent hardware iSCSI adapter, make sure to select the NIC that corresponds to the iSCSI component.
Use the vSphere CLI command to determine the name of the physical NIC, with which the iSCSI adapter is associated.(You should press Alt+F1 for command mode on esx)
Alt + F2 turn back)
esxcli swiscsi vmnic list -d vmhba#
vmhba# is the name of the iSCSI adapter.
vmhba# is the name of the iSCSI adapter.
You might be enable TEch Support mode to execute the commands above;
Enabling and Accessing Tech Support ModeTo enable local or remote TSM from the Direct Console User Interface (DCUI):
1.At the DCUI of the ESXi host, press F2 and provide credentials when prompted.
2.Scroll to Troubleshooting Options, and press Enter.
3.If you want to enable local TSM, select Local Tech Support and press Enter once. This allows users to login on the virtual console of the ESXi host.
If you want to enable remote TSM, select Remote Tech Support (SSH) and press Enter once. This allows users to login via SSH on the virtual console of the ESXi host.
4.Optionally, if you want to configure the timeout for TSM:
a.Select Modify Tech Support timeout and press Enter.
b.Enter the desired timeout value in minutes and press Enter.
6.Press Esc three times to return to the main DCUI screen.
After you have done the above 9 steps configuration- networking tab should be like picture below;
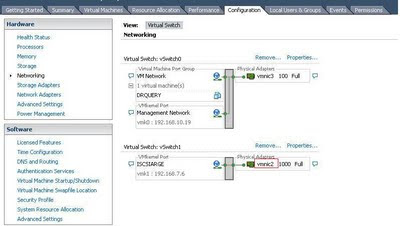
Before adding to ESX server you should create target and LUNs on ISCSI device.
1.At the DCUI of the ESXi host, press F2 and provide credentials when prompted.
2.Scroll to Troubleshooting Options, and press Enter.
3.If you want to enable local TSM, select Local Tech Support and press Enter once. This allows users to login on the virtual console of the ESXi host.
If you want to enable remote TSM, select Remote Tech Support (SSH) and press Enter once. This allows users to login via SSH on the virtual console of the ESXi host.
4.Optionally, if you want to configure the timeout for TSM:
a.Select Modify Tech Support timeout and press Enter.
b.Enter the desired timeout value in minutes and press Enter.
6.Press Esc three times to return to the main DCUI screen.
After you have done the above 9 steps configuration- networking tab should be like picture below;

Before adding to ESX server you should create target and LUNs on ISCSI device.
After this open Configuration Tab and select storage adapters from left menu.
Select the appropirate hba from the right menu and click properties and add IP and port (default 3260) of ISCSI device to dynamic discovery tab and 2-10 seconds later control the static discovery tab if the address added correctly

LUNs that you have created on ISCSI device should be visible on the below part like "QNAP ISCSI Disk (naa....) on the picture.
After adding ISCSI device IP, we should add LUNs as a storage to ESX server.
Open Configuration Tab- Select Storage from the left menu. Select AddStorage from right side.
Select Disk / LUN form the opened window click next.
Select the LUN that you will use as a datastore. Click Next give Name ex: "DRSQLSERVER"
Select the LUN that you will use as a datastore. Click Next give Name ex: "DRSQLSERVER"
Next,next,finish.
Then on previous screen click refresh to see your new datastore. Than you can use this datastore to install new virtual machine.

http://kb.vmware.com/selfservice/microsites/search.do?language=en_US&cmd=displayKC&externalId=1025644
http://searchvmware.techtarget.com/tip/VMware-Consolidated-Backup-Adding-an-iSCSI-LUN-to-ESX-Server
http://www.vladan.fr/how-to-connect-esx4-vsphere-to-openfiler-iscsi-nas/
http://www.mattlestock.com/2009/06/esxi-iscsi/
http://www.vmware.com/files/pdf/vmware_esxi_management_wp.pdf
Read more...
Thursday, April 7, 2011
SQL Database Rebuild or Reorganize Index
To choose rebuild or reorganize index process first you need to control index fragmentation status. Execute the code below, SQL Management Studio.
-------------------
Use AdventureWorks
GO
SELECT
ps.object_id,
i.name as IndexName,
OBJECT_SCHEMA_NAME(ps.object_id) as ObjectSchemaName,
OBJECT_NAME (ps.object_id) as ObjectName,
ps.avg_fragmentation_in_percent,
ps.page_count
FROM sys.dm_db_index_physical_stats (DB_ID(), NULL, NULL , NULL, 'LIMITED') ps
INNER JOIN sys.indexes i ON i.object_id=ps.object_id and i.index_id=ps.index_id
WHERE avg_fragmentation_in_percent > 5 AND ps.index_id > 0
ORDER BY avg_fragmentation_in_percent desc
---------------------------------------
If the value in "avg_fragmentation percent" column for index is grater than 30 the you should use rebuild else use reorganize.
Rebuild Code
ALTER INDEX [Index name]
ON [ObjectSchemaName].[ObjectName] REBUILD WITH (ONLINE = ON)
----------------------
Reorganize Code
Use AdventureWorks
GO
ALTER INDEX [Index name]
ON [ObjectSchemaName].[ObjectName] REORGANIZE
---------------------------------------
Note : Online index operations can only be performed in Standard or Enterprise edition of SQL Server.
--------------------------------------------------------
You can create a SP by using the code below for automaticly reorganize and rebuild indexes.
CREATE PROC [INDEX_MAINTENANCE] @DBName VARCHAR(100)
AS BEGIN
SET NOCOUNT ON;
DECLARE
@OBJECT_ID INT,
@INDEX_NAME sysname,
@SCHEMA_NAME sysname,
@OBJECT_NAME sysname,
@AVG_FRAG float,
@command varchar(8000),
@RebuildCount int,
@ReOrganizeCount int
CREATE TABLE #tempIM (
[ID] [INT] IDENTITY(1,1) NOT NULL PRIMARY KEY,
[INDEX_NAME] sysname NULL,
[OBJECT_ID] INT NULL,
[SCHEMA_NAME] sysname NULL,
[OBJECT_NAME] sysname NULL,
[AVG_FRAG] float
)
SELECT @RebuildCount=0,@ReOrganizeCount=0
--Get Fragentation values
SELECT @command=
'Use ' + @DBName + ';
INSERT INTO #tempIM (OBJECT_ID, INDEX_NAME, SCHEMA_NAME, OBJECT_NAME, AVG_FRAG)
SELECT
ps.object_id,
i.name as IndexName,
OBJECT_SCHEMA_NAME(ps.object_id) as ObjectSchemaName,
OBJECT_NAME (ps.object_id) as ObjectName,
ps.avg_fragmentation_in_percent
FROM sys.dm_db_index_physical_stats (NULL, NULL, NULL , NULL, ''LIMITED'') ps
INNER JOIN sys.indexes i ON i.object_id=ps.object_id and i.index_id=ps.index_id
WHERE avg_fragmentation_in_percent > 5 AND ps.index_id > 0
and ps.database_id=DB_ID('''+@DBName+''')
ORDER BY avg_fragmentation_in_percent desc
'
exec(@command)
DECLARE c CURSOR FAST_FORWARD FOR
SELECT OBJECT_ID,INDEX_NAME, SCHEMA_NAME, OBJECT_NAME, AVG_FRAG
FROM #tempIM
OPEN c
FETCH NEXT FROM c INTO @OBJECT_ID, @INDEX_NAME, @SCHEMA_NAME, @OBJECT_NAME, @AVG_FRAG
WHILE @@FETCH_STATUS = 0
BEGIN
--Reorganize or Rebuild
IF @AVG_FRAG>30 BEGIN
SELECT @command = 'Use ' + @DBName + '; ALTER INDEX [' + @INDEX_NAME +'] ON ['
+ @SCHEMA_NAME + '].[' + @OBJECT_NAME + '] REBUILD WITH (ONLINE = ON )';
SET @RebuildCount = @RebuildCount+1
END ELSE BEGIN
SELECT @command = 'Use ' + @DBName + '; ALTER INDEX [' + @INDEX_NAME +'] ON ['
+ @SCHEMA_NAME + '].[' + @OBJECT_NAME + '] REORGANIZE ';
SET @ReOrganizeCount = @ReOrganizeCount+1
END
BEGIN TRY
EXEC (@command);
END TRY
BEGIN CATCH
END CATCH
FETCH NEXT FROM c INTO @OBJECT_ID, @INDEX_NAME, @SCHEMA_NAME, @OBJECT_NAME, @AVG_FRAG
END
CLOSE c
DEALLOCATE c
DROP TABLE #tempIM
SELECT cast(@RebuildCount as varchar(5))+' index have been Rebuild,'+cast(@ReOrganizeCount as varchar(5))+' index have been Reorganized.' as Result
END
----------------------------------------------------------
Use the code below for calling SP
exec master.dbo.INDEX_MAINTENANCE 'DBName'
Read more...
-------------------
Use AdventureWorks
GO
SELECT
ps.object_id,
i.name as IndexName,
OBJECT_SCHEMA_NAME(ps.object_id) as ObjectSchemaName,
OBJECT_NAME (ps.object_id) as ObjectName,
ps.avg_fragmentation_in_percent,
ps.page_count
FROM sys.dm_db_index_physical_stats (DB_ID(), NULL, NULL , NULL, 'LIMITED') ps
INNER JOIN sys.indexes i ON i.object_id=ps.object_id and i.index_id=ps.index_id
WHERE avg_fragmentation_in_percent > 5 AND ps.index_id > 0
ORDER BY avg_fragmentation_in_percent desc
---------------------------------------
If the value in "avg_fragmentation percent" column for index is grater than 30 the you should use rebuild else use reorganize.
Rebuild Code
ALTER INDEX [Index name]
ON [ObjectSchemaName].[ObjectName] REBUILD WITH (ONLINE = ON)
----------------------
Reorganize Code
Use AdventureWorks
GO
ALTER INDEX [Index name]
ON [ObjectSchemaName].[ObjectName] REORGANIZE
---------------------------------------
Note : Online index operations can only be performed in Standard or Enterprise edition of SQL Server.
--------------------------------------------------------
You can create a SP by using the code below for automaticly reorganize and rebuild indexes.
CREATE PROC [INDEX_MAINTENANCE] @DBName VARCHAR(100)
AS BEGIN
SET NOCOUNT ON;
DECLARE
@OBJECT_ID INT,
@INDEX_NAME sysname,
@SCHEMA_NAME sysname,
@OBJECT_NAME sysname,
@AVG_FRAG float,
@command varchar(8000),
@RebuildCount int,
@ReOrganizeCount int
CREATE TABLE #tempIM (
[ID] [INT] IDENTITY(1,1) NOT NULL PRIMARY KEY,
[INDEX_NAME] sysname NULL,
[OBJECT_ID] INT NULL,
[SCHEMA_NAME] sysname NULL,
[OBJECT_NAME] sysname NULL,
[AVG_FRAG] float
)
SELECT @RebuildCount=0,@ReOrganizeCount=0
--Get Fragentation values
SELECT @command=
'Use ' + @DBName + ';
INSERT INTO #tempIM (OBJECT_ID, INDEX_NAME, SCHEMA_NAME, OBJECT_NAME, AVG_FRAG)
SELECT
ps.object_id,
i.name as IndexName,
OBJECT_SCHEMA_NAME(ps.object_id) as ObjectSchemaName,
OBJECT_NAME (ps.object_id) as ObjectName,
ps.avg_fragmentation_in_percent
FROM sys.dm_db_index_physical_stats (NULL, NULL, NULL , NULL, ''LIMITED'') ps
INNER JOIN sys.indexes i ON i.object_id=ps.object_id and i.index_id=ps.index_id
WHERE avg_fragmentation_in_percent > 5 AND ps.index_id > 0
and ps.database_id=DB_ID('''+@DBName+''')
ORDER BY avg_fragmentation_in_percent desc
'
exec(@command)
DECLARE c CURSOR FAST_FORWARD FOR
SELECT OBJECT_ID,INDEX_NAME, SCHEMA_NAME, OBJECT_NAME, AVG_FRAG
FROM #tempIM
OPEN c
FETCH NEXT FROM c INTO @OBJECT_ID, @INDEX_NAME, @SCHEMA_NAME, @OBJECT_NAME, @AVG_FRAG
WHILE @@FETCH_STATUS = 0
BEGIN
--Reorganize or Rebuild
IF @AVG_FRAG>30 BEGIN
SELECT @command = 'Use ' + @DBName + '; ALTER INDEX [' + @INDEX_NAME +'] ON ['
+ @SCHEMA_NAME + '].[' + @OBJECT_NAME + '] REBUILD WITH (ONLINE = ON )';
SET @RebuildCount = @RebuildCount+1
END ELSE BEGIN
SELECT @command = 'Use ' + @DBName + '; ALTER INDEX [' + @INDEX_NAME +'] ON ['
+ @SCHEMA_NAME + '].[' + @OBJECT_NAME + '] REORGANIZE ';
SET @ReOrganizeCount = @ReOrganizeCount+1
END
BEGIN TRY
EXEC (@command);
END TRY
BEGIN CATCH
END CATCH
FETCH NEXT FROM c INTO @OBJECT_ID, @INDEX_NAME, @SCHEMA_NAME, @OBJECT_NAME, @AVG_FRAG
END
CLOSE c
DEALLOCATE c
DROP TABLE #tempIM
SELECT cast(@RebuildCount as varchar(5))+' index have been Rebuild,'+cast(@ReOrganizeCount as varchar(5))+' index have been Reorganized.' as Result
END
----------------------------------------------------------
Use the code below for calling SP
exec master.dbo.INDEX_MAINTENANCE 'DBName'
Read more...
Monday, March 21, 2011
Mailbox stay in disconnected after move mailbox process
Solution
Exchange 2010
Organization Configuration->Mailbox->RightClick to old database->;Properties
Limits Tab-;Set Keep Deleted Mailboxes to Zero (0)
and then on EMS execute the command below;
Clean-MailboxDatabase "Old Database Name"
In order to learn Database name;
Get-mailboxdatabase
Exchange 2007
Server Configuration->Mailbox->RightClick to old database->Properties
Limits Tab->Set Keep Deleted Mailboxes to Zero (0)
and then on EMS execute the command below;
Clean-MailboxDatabase "Old Database Name"
In order to learn Database name;
Get-mailboxdatabase
Exchange 2003
http://support.microsoft.com/kb/940012
Read more...
Exchange 2010
Organization Configuration->Mailbox->RightClick to old database->;Properties
Limits Tab-;Set Keep Deleted Mailboxes to Zero (0)
and then on EMS execute the command below;
Clean-MailboxDatabase "Old Database Name"
In order to learn Database name;
Get-mailboxdatabase
Exchange 2007
Server Configuration->Mailbox->RightClick to old database->Properties
Limits Tab->Set Keep Deleted Mailboxes to Zero (0)
and then on EMS execute the command below;
Clean-MailboxDatabase "Old Database Name"
In order to learn Database name;
Get-mailboxdatabase
Exchange 2003
http://support.microsoft.com/kb/940012
Read more...
Subscribe to:
Posts (Atom)
Subscribe To This Web Site


 Posts
All Comments
Posts
All Comments


